Sunday, December 12, 2010

The 12 Days of Christmas Cookies - Day Two - Peanut Butter Kisses

These are the peanut butter cookies with the Hershey's Kiss in the center.  They are very easy to make and delicious when they're done.  The biggest part of the job is unwrapping all of the Kisses.  Don't wait until the cookies are baking to do this as you will need to have them ready as soon as the cookies come out of the oven.


Set the oven to 375 degrees and gather together the following ingredients:


Starting at the top and working clockwise we have one stick of butter at room temperature, 3/4 cup of creamy peanut butter (I have never tried this with chunky, only creamy), 1/3 cup of granulated (white) sugar, 1/3 cup of firmly packed light brown sugar, one egg, 2 tablespoons of milk, 1 teaspoon of vanilla extract, 1 1/2 cup of all-purpose flour and 1 teaspoon baking soda mixed with 1/4 teaspoon salt.  In the center are 48 Hershey's Kisses.  The 12 ounce bag is plenty and you will have Kisses left over for munching on.

Mix the butter with the peanut butter in a large bowl (or use a mixer).  Add the sugars, egg, milk and vanilla, beating continually until all ingredients are well blended.  Mix the baking soda/salt in with the flour and add this mixture to the peanut butter mixture gradually.  I do this one large spoonful at a time.  Once the dough is all mixed together, separate it into four equal pieces.

Form each piece into a ball and cut the ball into twelve equal pieces as shown below:


Cutting like this will ensure that the cookies are all about the same size.  Or, you can weigh the large ball and divide it by 12, then weigh each ball that you make from the large ball, adding to it or subtracting from it as necessary but that seems like entirely too much work.  The finished balls should look something like this:


Roll the balls in granulated (white) sugar and place them on an ungreased cookie sheet.  Note that in the picture below they're spaced rather far apart.  This isn't necessary as they don't spread very much when they're baking.


Bake for 8 to 10 minutes, until they're a golden brown.  Immediately upon removal from the oven, and while they're still on the cookie sheet, press a Kiss into the center of each cookie.  As soon as you've finished adding the Kisses, remove the cookies to a wire rack and allow them to cool completely,

The finished product will look something like this:


Bon appetit!


Monday, December 6, 2010

The 12 Days of Christmas Cookies - Day One - Rugala

Rugala!  This might not be what you would think of as a Christmas cookie but I think it works.  This recipe is done in two steps; first we make the dough and then the filling.  For the dough you will need to gather the following:


Starting from the top we have 8 ounces of cream cheese, two sticks of butter (both of these ingredients at room temperature), 2 tablespoons of sugar and 2 cups of flour.  Put all of these into a mixer and blend until a dough forms.  Place the dough on a floured surface and divide into four parts, as seen below.


Once the dough is divided, roll each quarter into a ball, like so:


Place a square of wax paper on the counter and lightly flour it.  Place one ball on the paper and lightly flour the ball as well.  Place a second piece of wax paper on the top and use a rolling pin to roll the ball into a ten-inch round.


I have been rolling out pie crusts for over 30 years and I have yet to achieve a form that I would consider round.  They start out round but after a few strokes they become a sort of a lozenge shape.  After that, they continue changing into what I can only describe as an amoeba shape.  Go with your strengths.  I'm making Amoeba-shaped Rugala.


When you have the four balls rolled, place them in the refrigerator for at least one full hour.  They can stay in longer but no less than one hour.  The dough must be sufficiently chilled or you will not be able to work with it.  DO NOT SKIMP ON THIS STEP.


While the dough is chilling, gather the ingredients for the filling.  You will need a 12 ounce jar of preserves.  The flavor is up to you.  You will also need one cup of ground nuts.  Again, the flavor is up to you but it should be something that goes with the preserves.  I used walnuts.  You will need one cup of currants.  For some reason, these are hard to come by in Los Angeles so I substituted raisins.  Rounding out the picture below are 1/2 cup of sugar and 1 teaspoon of cinnamon.  Mix these four ingredients together (do not mix in the preserves).  Divide into four portions.  Set aside.


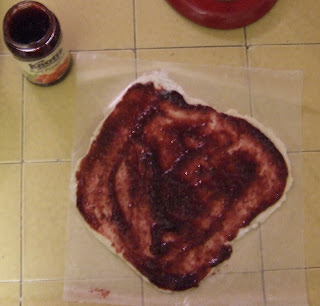
After the dough is sufficiently chilled, remove it from the refrigerator and carefully peel off the top layer of wax paper.  Prepare a surface to work on and lightly flour the surface.  Turn the dough over on the prepared surface and remove the wax paper from the other side.  (Do not follow the picture below; leaving the dough on the wax paper made quite a mess.)  Spread 3 ounces of preserves on the dough.  Here I used raspberry preserves.


Pour 1/4th of the filling ingredients over the preserves and spread it evenly.  When finished, cut the dough down the center, then cut each half into quarters.  Finally, cut each quarter evenly so you will have eight cookies from each ball of dough.  My recipe calls for cutting into 12 pieces but I found that 8 was much easier to work with and came out better.


When you have them cut, roll them up starting at the pointed end (in the center) and rolling toward the wide end.  Place them on a greased cookie sheet with the seam side down.  Bake in a 375 degree oven for 17 minutes. 


As soon as you remove them from the oven, place them on a rack to cool.  When they are baking some of the filling will ooze out onto the cookie sheet.  If you let them cool on the cookie sheet, they will stick to it from the part that oozed out.  Also, wash the cookie sheet immediately, even though it's still very hot or you will have a fruit-flavored cement to try to chip off afterwards.


Bon appétit!